
The “One on One” is the most feared situation a GK will face – it’s you versus the striker, winner takes all.
Examples are;
- a ball punted over the defense, landing between the striker running onto it, and you the goalkeeper
- the striker dribbles through the defense and is alone running at you, no defenders to help
- a penalty – yes that’s a one-on-one – you versus the penalty taker.
All one-on-one’s require similar techniques, and in this and future posts we’ll discuss what are the best options, dependent upon the exact situation.
In this post, we’ll break down the challenge into three different stages; the “Meet”, the “Action”, and the “Re-action”.
Each phase or stage requires a well thought out approach, where we use techniques like “making a shape” and disciplines like “staying on our feet”.
Stage 1 – The Meet
All keepers are taught that getting closer to the striker makes you “look bigger” to them. So where you “meet” the striker will impact how successful you are.
But there is a trade-off between rushing out and making yourself big, and getting chipped, or passed-around.
We discussed this here, when the Arsenal keeper Cech decided to meet the striker close to his six-yard box, rather than the edge of the penalty box.
With the scoreline 0-1, Arsenal went in search of an equalizer, and were caught on the hop… the Man City striker Aguero collected the ball just inside the Arsenal half and was through on goal with only Peter Cech, the keeper to beat…..he even had support from Kevin De Bruyne, who could also score easily….if he’d rushed out to meet Aguero on the edge of the penalty box, he’d have been passed around – Aguero would have passed across to his teammate who’d have an empty net.
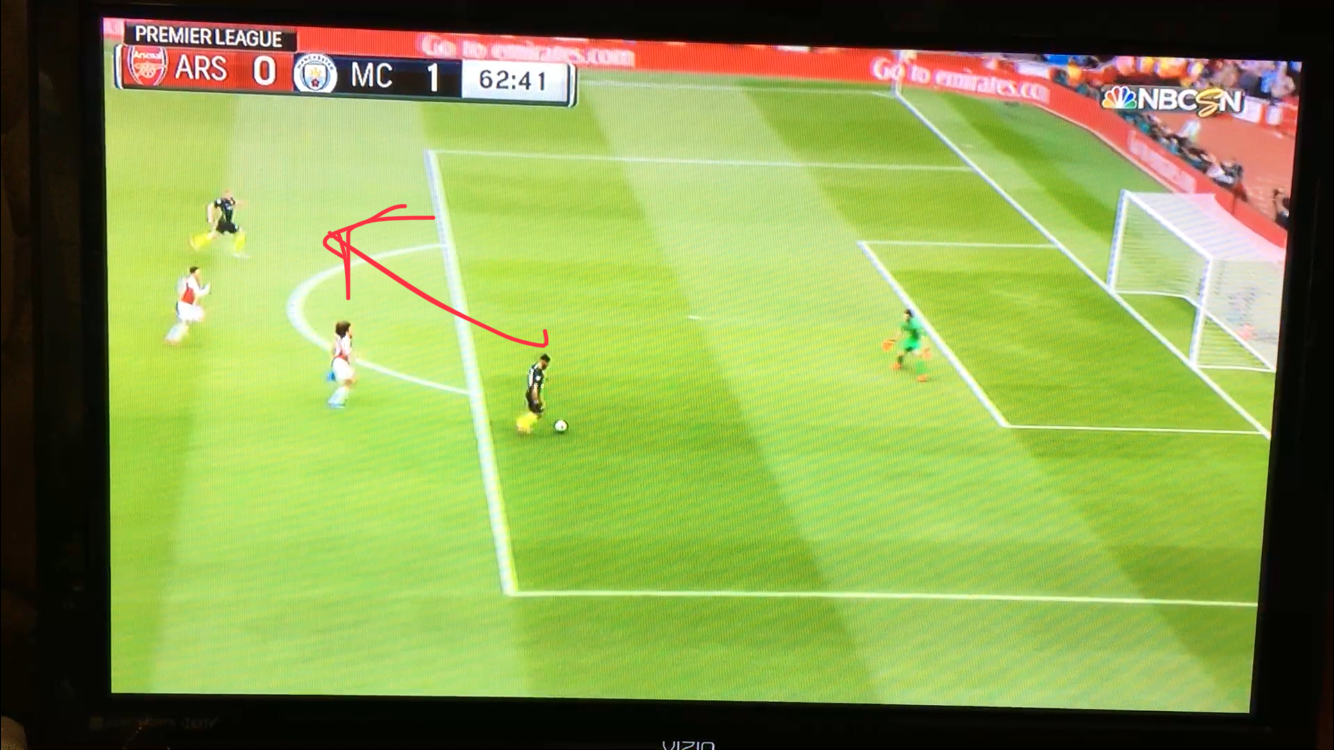
However, wherever you decide to meet the keeper, you need to get there fast.
If you meet the striker close up, towards the edge of the penalty box, slow down as you get there, staying on your feet, and ready to make a shape.
If you go to ground too soon, the striker will simply go around you and score.
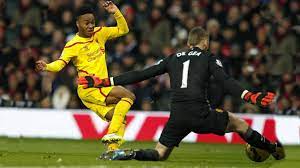
Here, Joe Hart explains how to meet the striker, being careful to keep a good angle between the ball the the goalposts (see here) and ready to make a shape.
Making a shape
There are many different types of “shape” you can make as you meet the striker – that’s to say, the shape you make with your body, hands and feet, as you reach the striker.
In the video, Joe calls his shape a “spread”, which we’ll discuss below.
The different shapes a keeper makes all have advantages and disadvantages, and it’s up to the keeper to decide which they like and feel comfortable with.
There is also no real set names for each of the shapes – different coaches call them different names and the terms can get muddle up. Try not to worry about the names, focus on the actual shape it makes.
I use these names to remind me which one’s I’m talking about, and while others might call them different things, it matters very little
Star/Spread/”K”
- this is the most common shape discussed and you’ll see a lot of top-class keepers employing some variation of this shape
- Essentially it looks like a letter K as this photo shows


- The clear advantage is the keeper can stay upright while making the shape, and re-act quickly.
- A disadvantage is that the hands have a lot of work to do to protect the side of the body.
- There are variations, like the Protracted-Star, where the hand closest to the kneeling leg starts closer to the gap between the legs, to prevent being “megged”.
Stalker/Monster
- This shape is a little less common than a star, but can be effective, especially as the keeper gets close to the striker, perhaps before turning it into a star/spread.
- It looks a little like a monster, with hands closer to the body, arms extended, and legs closer together. These pics gives you an idea of the differences.
-


- It doesn’t present such a big image as a “spread/star” so makes a shot more likely as the striker can see more of the goal, but it does help a keeper stay on their feet as they “meet”.
- By staying on their feet, the keeper can move with the striker, “stalking” them, ready to pounce when the ball is available, eg if the striker takes a bad touch.
Block
- The keeper takes up a star or monster shape, but as striker tries to dribble around the keeper, the ball is pushed to one side and the keeper throws a foot out to try to intercept the dribble.
- Here is an example, where the keeper goes straight into the block tackle.
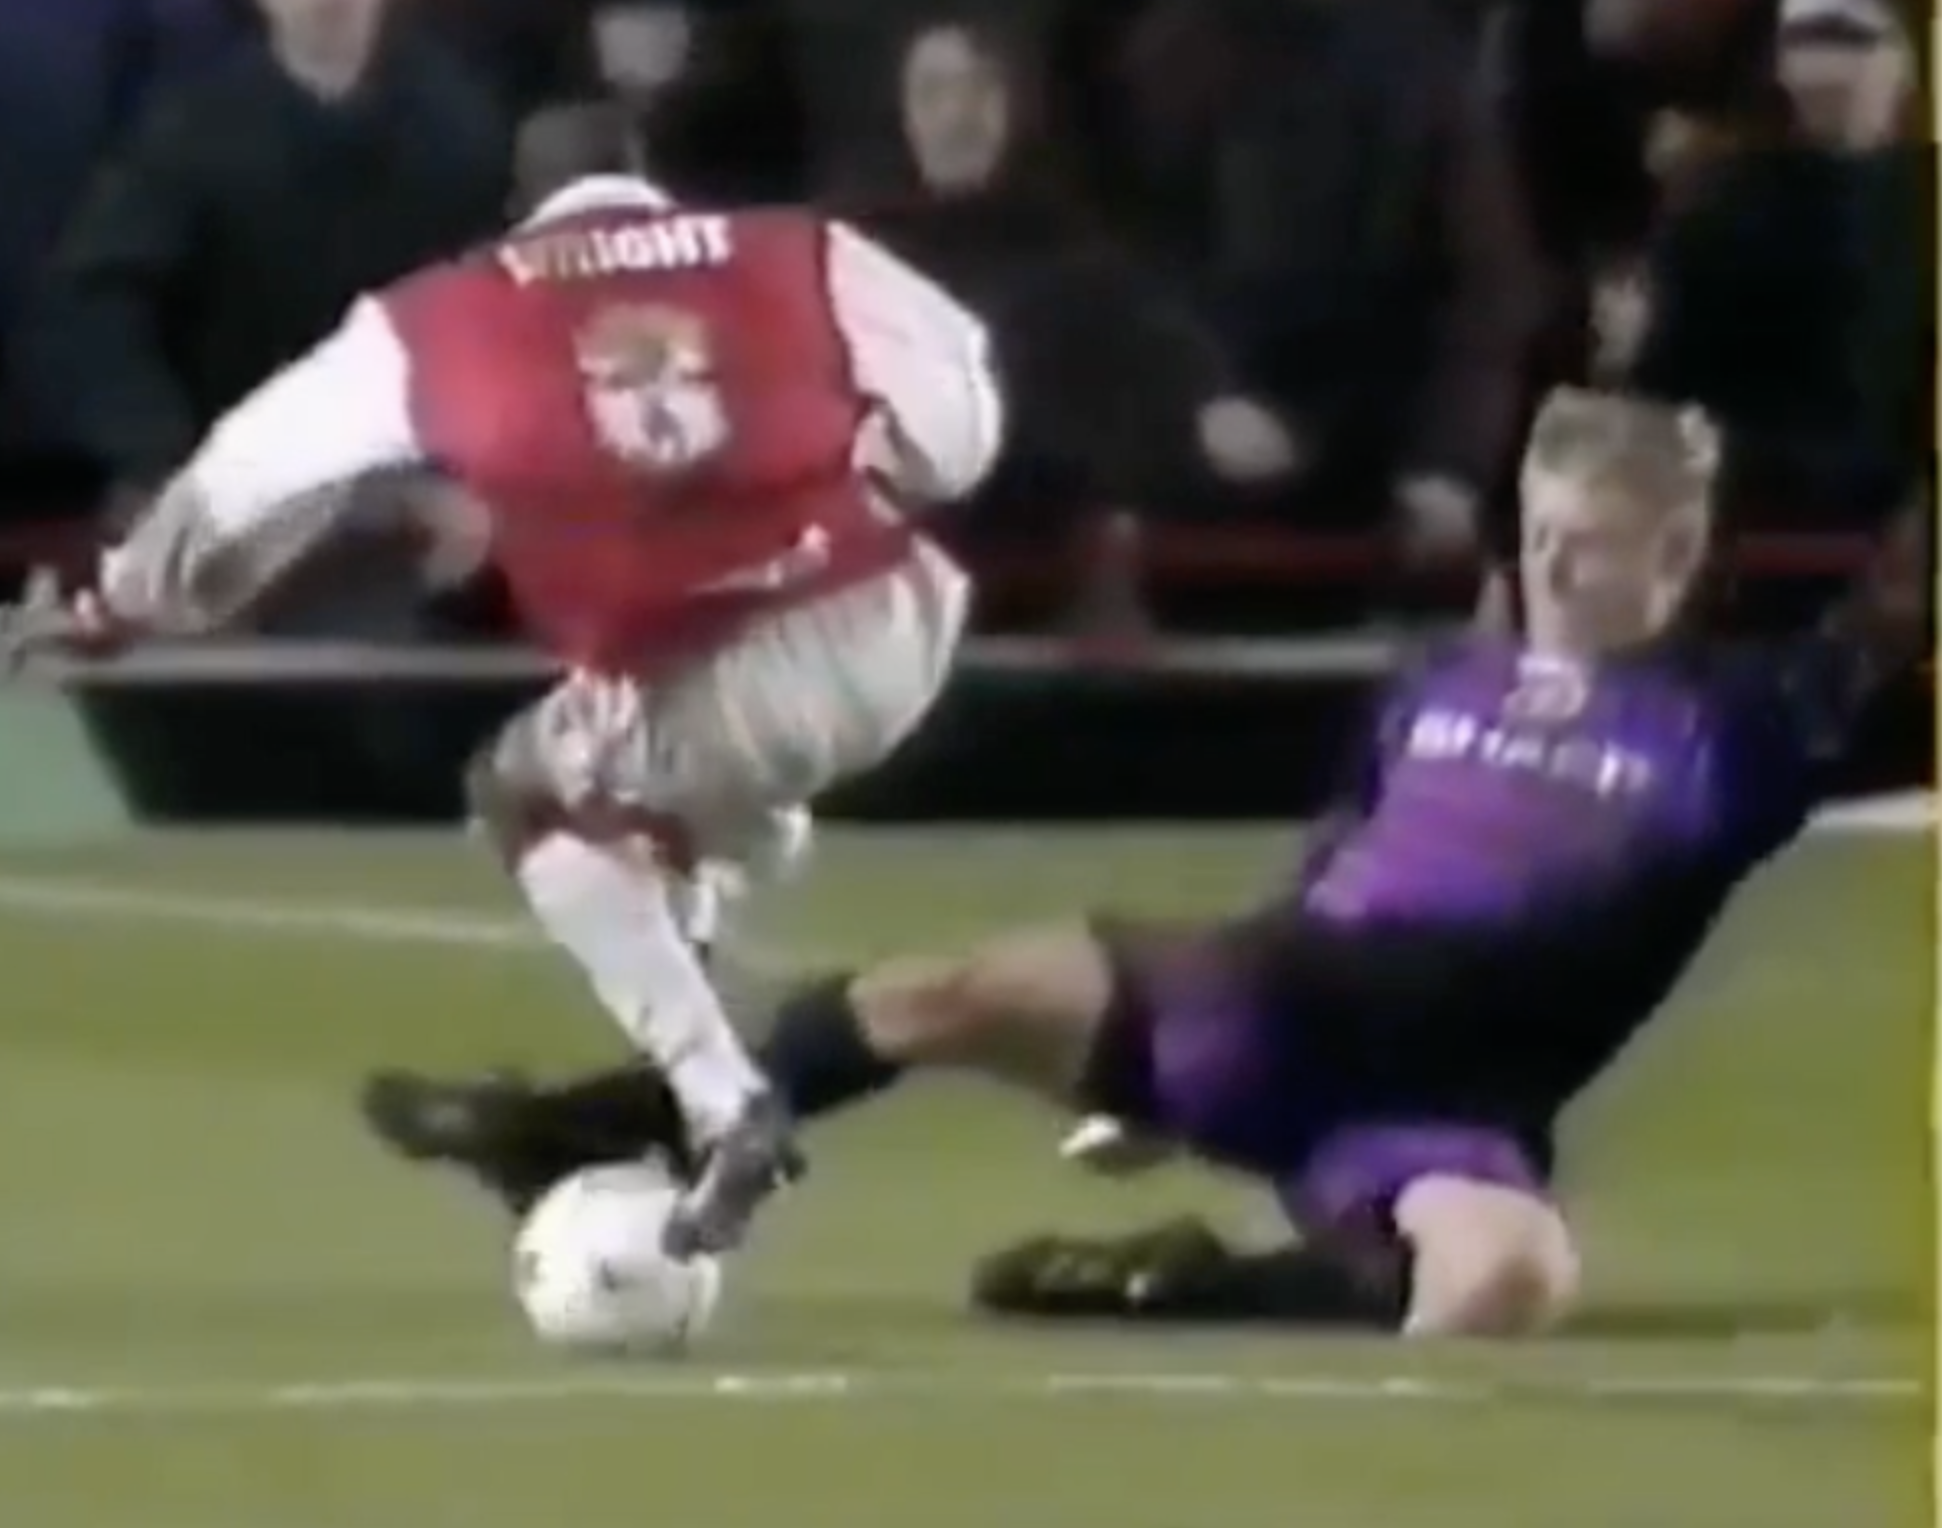
- This is essentially the same block tackle that a defender would employ, and therefore is common when the keeper meets the striker outside the penalty box and can’t use their hands.
- An advantage is the keeper is using their feet, a safer option than putting their hands in harms way.
- But the keeper is likely to end up on the ground, and as such, this may not be ideal for the 3rd stage – the re-action.
Long Block/Barrier
- This shape is an adaptation of the star – but as the striker looks to take a shot, the keeper brings one leg close to the ground (knee on the ground) as they throw the opposite leg outwards.
- This action makes both legs a “long barrier” to stop the ball.
- The shape is a large one, and looks quite intimidating to the striker, helping put them off.
- But the disadvantage is that the keeper will be on the ground and out of control of their body, which makes recovery and “re-action” very unlikely.


Smoother/Superman
- We saw Joe Hart employ the “smoother” in the video, seeing the striker lose control of the ball presenting him with an opportunity to dive on it.
- The keeper will end up lying flat on the ground, with arms outstretched. You can see why this is also called the “superman”.
- The advantage is clearly that most of the time the ball will be secure and safe in the keepers hands.
- However, the keeper has to be confident they can get the ball and recover safely into the protective position.
- The risk of getting kicked, especially in the head, is serious. This shouldn’t be attempted by younger keepers without a lot of practice and coaching.


Stage 2 – The Action
Once the keeper has made their shape, they need to try to read the striker’s intentions – are they going to shoot, or try to dribble around the keeper, or even pass to a teammate ( as Aguero could have done above).
This is where the keeper ACTS – they might simply stay on their feet and follow the striker with the ball, staying in front, and perhaps try to lead them wider. This will help make any shot more difficult, and the goal gets smaller as the angle of the shot gets smaller, as the striker is forced wide.
Or, the ACT or ACTION might be to dive onto the ball and try to smoother it (as Joe Hart does in the video above).
Once the keeper acts, they have to be ready to respond to the outcome – where the ball goes, and who has it.
This leads to the next phase, where the keeper re-acts to the outcome.
Stage 3 – Re-action
Once the striker has decided what to do, and the keeper has acted (eg smothered the ball, parried it wide with a block, etc) the ball is either safely in their hands, or is still bouncing around, dangerous.
The keeper then has to Re-act.
If the keeper has the ball, then a good re-action is to jump up and quickly and distribute the ball, to try to catch the attacking team off guard, having all pushed up the field.
More likely though, the ball is free and the striker, or his teammate will be trying to gain control ready to try to score.In that case, the keeper goes back to stage 1 – and tries to meet the striker ready to make another save.
If you’re lucky, a defender or two will have come back to help, and they may be closest to where the loose ball ends up. Then they can engage the strikers, and the correct re-action of the keeper might be to re-set closer to the goal and see how things progress.
Summary
In this post we explained the three stages of dealing with a one v one;
- The Meet – where on the field you meet the striker, close enough to engage them depending what they do. That might mean up close, about a yard away, ready to pounce, having made a shape (eg a spread or star). Also, as we say with Cech versus Aguero, it might be smart to “meet” the striker a long way away from them, and set for a shot, perhaps to prevent them passing to a teammate.
- The Action – our response to what the striker chooses to do – if they dribble past us, can we drop on the ball and smoother it, should we we try a “long barrier”, or perhaps simply follow them on our feet, making a stalker/monster shape, hoping they are pushed wide and ruin their shot.
- The Re-action – after we’ve played our hand, and responded to the striker, depending upon where the ball ends up, we have to re-act and perhaps start again, trying to meet the striker again where the ball has ended up. Or better still, if we have the ball, get up quickly and boot it over the heads of the advancing opponents and start our own attack.
If you follow this simple pattern – Meet/Act/Re-act – you should find more success with the dreaded 1v1.
Tips for coaches – Confidence Cohesion Technique
Any coach can utilize these drills with their keeper. The objectives are the same – enhance footwork, follow the ball better with the eyes, and judge the flight of the ball.
A coach can use any one of the drills independently, and involve multiple players, especially attackers, to sharpen their skills too.
Try to encourage the keeper to use these skills – their footwork, their eyes and reflexes, and be brave to make the judgement calls and decisions that will come up regularly in games.
