
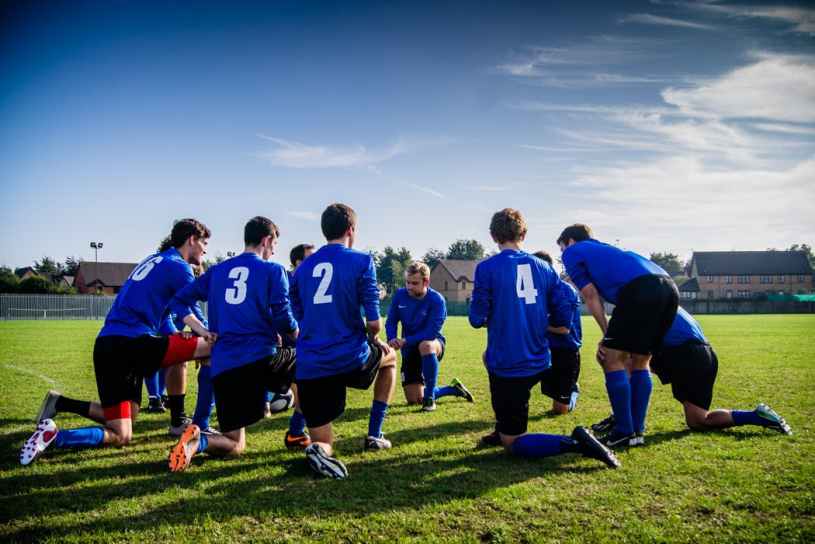
To dust off some of the inevitable rust, we worked on the basics for our older keepers – catching, footwork, disorientation and distribution.
Older Keepers – 2001-2006
Four session points for this session;
- Catching – high balls from crosses
- Footwork – using hoops and cones, and catching/shot stopping
- Disorientation – introducing 360 degree spins into exercises.
- Distribution – Kicking and throwing, and decision making
Session Details
After the mandatory stretches, we start with reverse-reflex, where 3-5 keepers stand next to each other on the line, but facing away from coach.
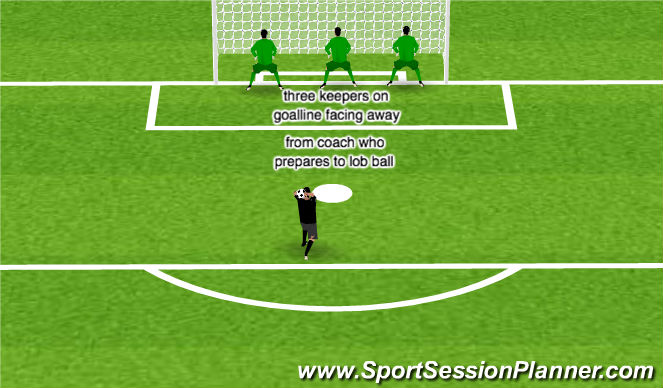
On the call of “go”, all keepers flip around to face the coach, and ready for a thrown or kicked “save”.
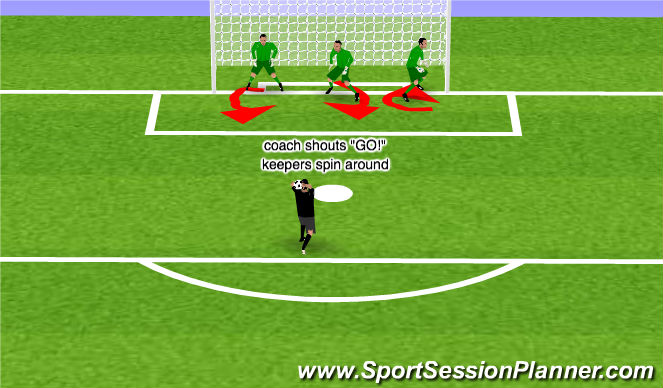
Coach throws towards one keeper.
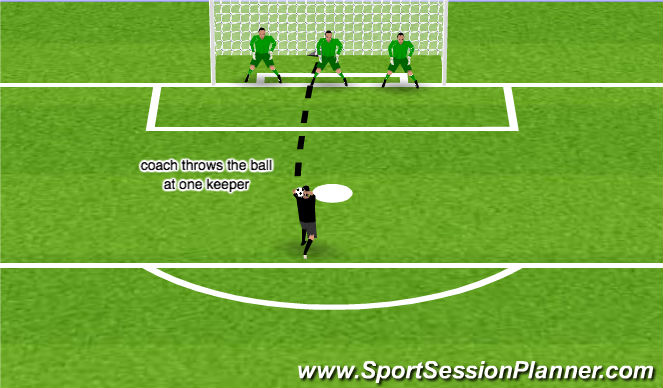
Only one will make the save, the others expected to go down on one knee.
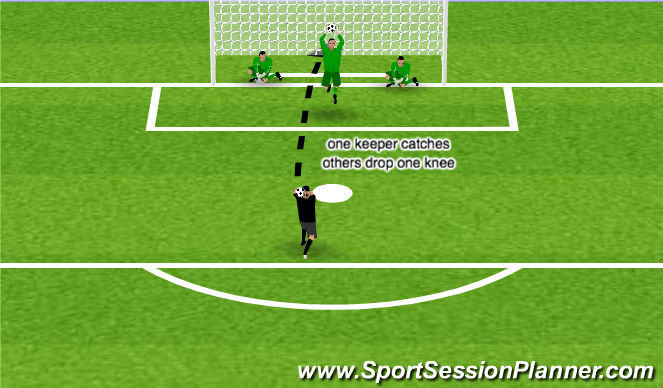
The purpose of the drill is to sharpen the reflexes – the keeper goes from seeing nothing to having to find the ball, judge its flight, the intensity of shot, and whether it’s shot at them (make the save) or a colleague (and go down on one knee).
This is a great drill for sharpening reflexes, and also for driving home other lessons which have been covered in the session. The coach can see if the keeper moves their feet quickly and precisely, makes good decisions (save or kneel) and picks the ball out quickly.
After 8-10 attempts, some with thrown “shots” some with kicked shots, the keepers will all be sharper and faster and more decisive. They also learn to cope with “obstructions” – other players also going for the ball, and how to deal with the melee of a goalmouth.
Footwork – hoops – catching a thrown or kicked high ball, with 360 degree twists.
This is a variation of the basic hoop footwork exercise, where the keeper skips between 8 hoops laid in pairs on the floor, hoops number 5&6 set further apart, followed by a passed ball which they either pass back, or trap, and finishing with another ball thrown over their left shoulder to try to catch or punch.
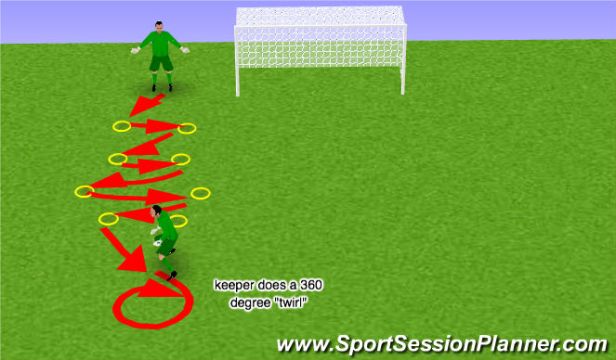
Once through the hoops, the keeper has to do a 360 degree twirl or spin, to face the coach who then passes a ball along the ground. The keeper passes it back to the coach
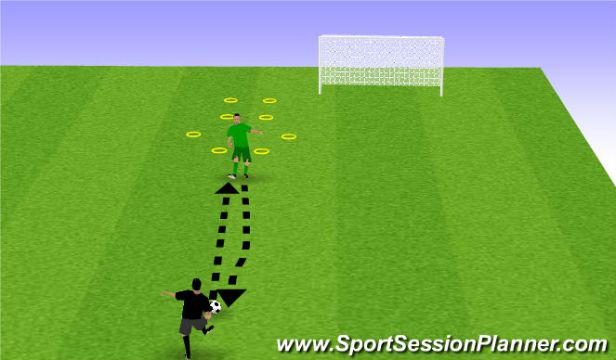
Having returned the pass, the keeper does another 360 degree twirl, but in the OPPOSITE direction to the first twirl. Then the keeper moves across towards the target/goal and catches a high throw or shot.
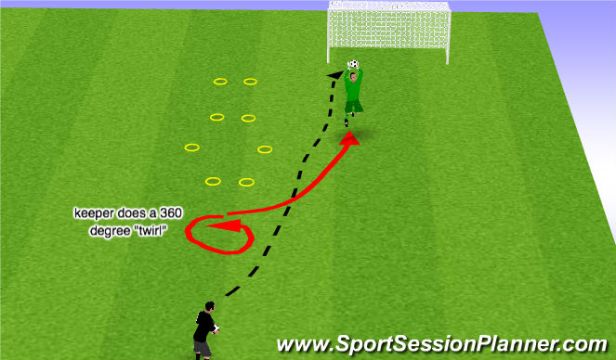
This exercise is excellent for developing footwork precision. If your feet aren’t planted carefully inside the hoops you’ll soon find yourself “hoolahooping”. This encourages the brain to switch from stepping to ball control. A typical movement when playing sweeper-keeper.
Ideally make a catch, but some throws are too difficult and require a punch out of harms way. Having a small 6 aside goal behind focuses the keeper’s mind, but it’s not essential.
The 360 degree twirls act to disorientate the keeper, inducing slight dizziness. This will act to make the brain work faster, when trying to locate the final throw/shot.
After 5-6 goes each, the keepers are all warm and sharp. Now it’s useful to move onto aligning the eyes. Try the other side – over right shoulder.
A variation is where the coach shoot or kicks the ball rather than throws high. This makes the challenge harder.
Footwork – skip through cones and make save.
Lay out 8 cones in a line. Keeper skips through the line, then turns towards the thrower/kicker, and makes the save. Keepers queue and start through cones once previous keeper makes save.
The ball can be thrown or kicked depending on the skill level. The important feature of this exercise is footwork, and making the save.
The keeper weaves through the cones, facing outwards, and eventually ends at the goal. They make their “set” (the position they set their feet ready to dive or save the shot) dependent upon where the coach is striking the ball from. there are three striking points, each demanding a slightly different set point.

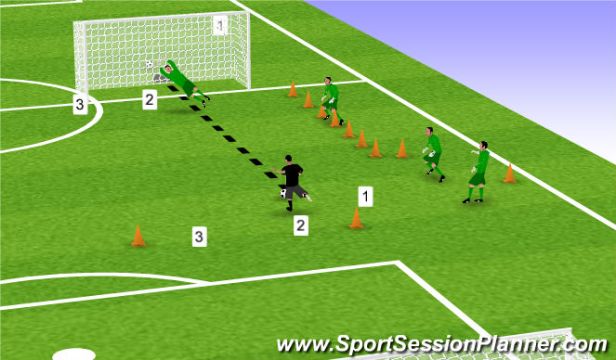

The coach increases the intensity of the shot. These are around 12 yards so simulates a penalty and can be blasted or placed. But the keeper has to make the appropriate set to have a chance.
Don’t expect the keeper to save every shot – the key is their footwork into the set, the choice of set, and the attempt to make the save.
Practicing throwing – various methods.
There are 4 main methods of throwing a ball out and we covered them all here, including their advantages and disadvantages.
In this session we practiced over-arm and rolling, aimed at improving accuracy and distance.
Confidence – decision making when dealing with a back-pass
The most common complaint from team coaches seems to be on distribution. Most keepers are good shot stoppers, but their ability to relieve pressure and transition or switch play is often less than perfect. In this short post we describe a small scale drill a coach can utilize to improve the keeper’s ability with their feet, and more importantly, their decision making.
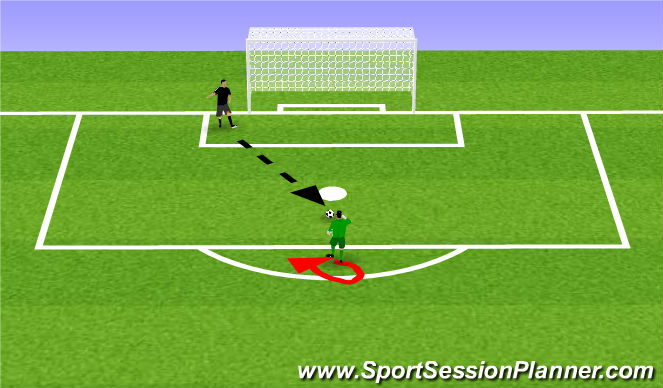
In this drill, the keeper stands on the edge of the penalty area (the “D”) facing away from goal.
The coach, standing next to one of the posts, starts the drill with a “go”.
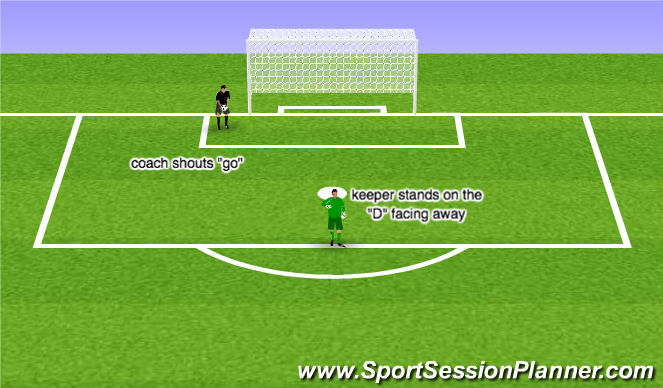
The keepers turns 180 degrees to face the goal as the coach feeds them a ball on the ground, simulating a back-pass.
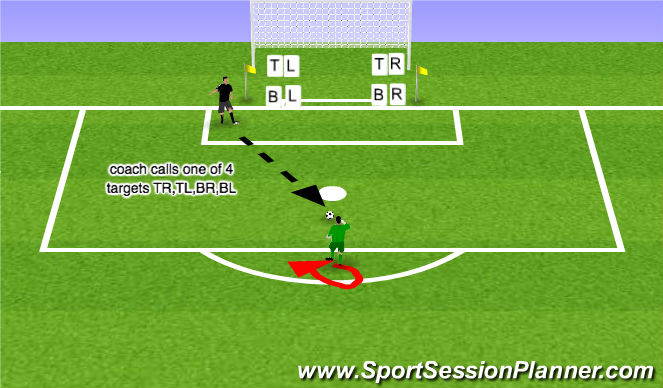
The coach has already described the target zones to the keeper – top and bottom, right and left, corners of the goal. Use the goal to prevent chasing a ball all night, but it’s only necessary for the target positions. A couple of flags are just a useful.
The twisting around 180 degrees helps induce a slight panic and disorientation, which is often the case in a real back-pass in a game.
Once the ball has arrived at the feet of the keeper, they either take a touch, or if the coach prefers, makes the one-touch pass/shot directed at the target zone, eg TR or top-right.
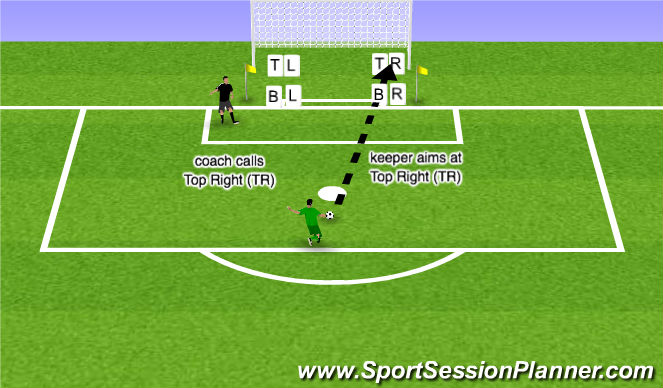
You can induce even more disorientation and “decision making” by making the regions reference the opposing sides – eg right becomes the right-hand side as the keeper is facing away, NOT as they are facing. In essence, right becomes left and vice versa.
Bottom means on the ground, while top just means “lofted”, not exactly in the top corner.
While the accuracy is important, the crucial aspect of the drill is the decision making. Facing away, listening for the coach to shout the target, then registering the passed ball and deciding where on the target area the target zone actually is (eg TR) is quite a lot of “thinking”.
This drill, done 8-10 times, will certainly test a keeper and enhance their thinking speed and decision making.
How should a keeper be best prepared for a backpass? Well they should already have a good idea where everyone is and where players are motioning towards, before the pass. Is this unreasonable to expect?
If you’ve played chess, then you know the answer is no. When you make a move in chess, you already have a good idea where pieces are already, and the latest new information is the last move by the opponent. A good keeper views their “defensive arena” as a chess board, with each piece already noted. They should already have a good idea of the best move – who to pass to and how – before the ball is passed to them.
In this drill, they should already be confident they know where right and left are on the goal. However, the 180 degree twirl can put that “belief” to the test, just as in a normal game situation.
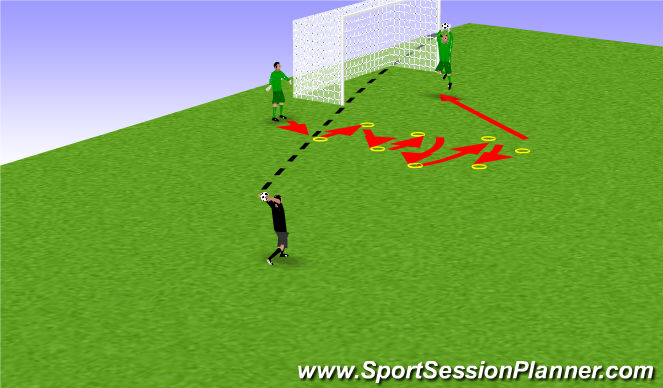
Diving from a kneeling position – improving the catch when diving
Young keepers often have a problem with diving. They usually fear the impact when they hit the ground, or dive with insufficient training and hurt themselves. In this post we propose an easy drill to build the skill of catching while diving, without the full impact of a dive.
If you’ve ever coached really young (8-9) year old keepers, you’ll be wondering what we’re talking about. Most love throwing themselves around, and if they like being keeper at all it’s because they can “make a dive”.
Well pretty soon all keepers will make one of the those dives that hurts, and makes them think twice. If they’re not coached the correct way to make a dive soon they’ll develop habits which make catching and securing the ball more difficult.
This drill begins that process. It’s important to get them catching and securing the ball before they learn any of these bad habits.
The coach faces the kneeling keeper and makes a throw or shot close enough to the keeper to allow a catch.
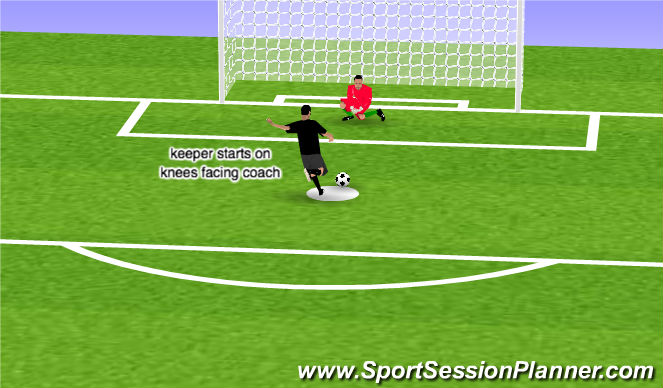
The keeper will simulate a dive, but by rolling the hips and catching the ball with both hands. By tucking the elbow in rather than lowering it towards the ground, the ball is easier to catch. Pull it into the chest to complete the save.
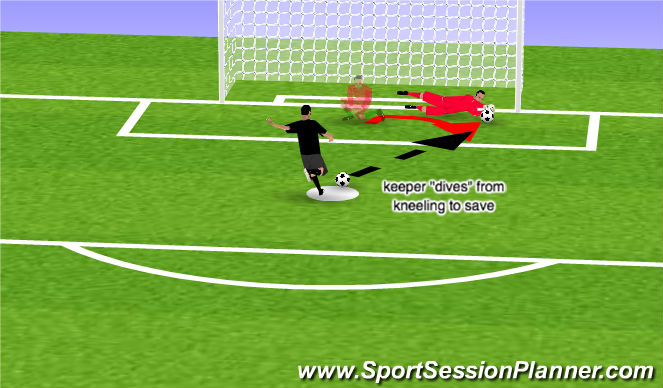
Diving from a kneeling position prevents the need to dive fully, and cushions the impact on the hips and knees. A full blown dive requires the body to hit the ground from about twice the height. This can cause injury if not practiced with the right training and care, even on the softest surfaces.
But even if the keeper is comfortable diving full length from standing, they often use their arms (elbows) or hands to cushion the blow, which makes catching the ball much harder. This soon becomes a habit or reflex.
By starting the keeper on their knees and perfecting the catch and clutch-to-chest first, there is a greater chance they won’t develop that bad “arm down” habit.
Also, it’s common for keepers to have a “favorite side” to dive. In other words, they dive with greater ease and comfort on one side, relative to the other. This is not as simple as preferring a “hand” – ie being right handed, left footed, etc. It can be the opposite side (eg a right handed player prefers to dive to their left hand side).
This drill can help improve the “weaker” side, and make the keeper more “two-sided”, having similar ability diving to the right or the left.
Dead-Ball kicking – goal kicks, improving the distance and technique.
Young goalkeepers are rarely good with their feet, especially when they start out. So we usually spend some time on “kicking” as well as “positional” footwork. In this section we approached “dead-ball kicking’ as one would do in a goal kick.
Many goalkeepers have problems with goal kicks. Not just younger keepers. Subject to the size and strength of the keeper, it then boils down to a combination of kicking technique and mental attitude.
For beginner keepers, we like the following structure or routine. It won’t work for everyone, but it will give the young keeper a template to build their own routine.
- Choose your target for the ball – left or right hand side of halfway line.
- Place the ball on the side of the 6 yard box which makes kicking to your desired. If you’re lick to the left, put the ball on the left of the 6 to make it easier. This doesn’t prevent you from aiming a kick from the right of the 6 towards the left hand side – just easier to achieve.
- Place the ball like its your grandmother’s fragile vase. You break it you suffer. Think about the ground – are there divots where the ball can fall into a hole?. Is the ground firm around the ball, where your “standing foot” will land. Above all, take it seriously.
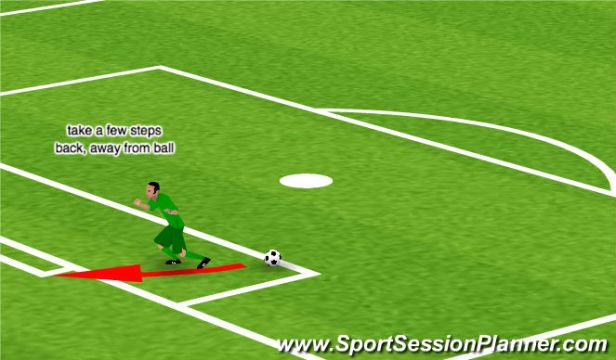
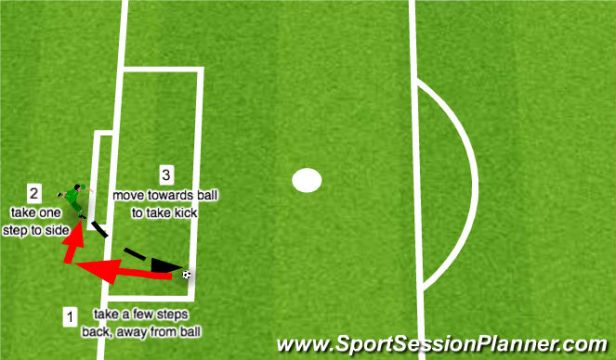
- Take a few steps back away from the ball, and one to the side, away from the line of the ball.
- The move quickly towards the ball to make the kick
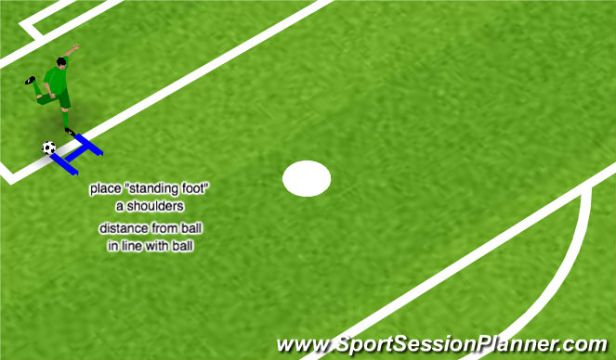
- Try to land your “standing foot” – NOT the kicking foot – about a shoulders distance from the ball. In other words, about the distance between your shoulders. If your standing foot is too close to the ball you may kick it – ouch!
- Place your standing foot about in line with the ball. If your too far in front of the ball, or too far behind the ball, you’ll mis-kick. Try it, but prepare to fall over and be laughed at!
- Follow through with the “swing” of your foot.
- If you’ve seen golfers, they carry on swinging the club well after they’ve hit the ball.
- You’re doing the same. It will give more power and help balance your body – try not to fall over!.
This won’t work for every keeper. But it will give the young keeper a template from which to build their own routine. Every keeper makes a bad goal-kick. The secret is not to let it get into your head.
Above all, don’t expect to get this straight away – persevere. And when you do a “bad kick” follow the procedure for the next one, having already forgotten the last one.
Pause a few seconds and take a breath. You can do this!


In this drill we practice by kicking the ball from about 3 yards from goal, into the net – saves chasing the ball all night! The keeper should aim to hit the net hard and high – about 4 foot off the ground or higher. Each keeper take a kick in rotation. After 2 goes each, stop and coach each keeper with positive comment. Don’t forget, its mainly in the head – confidence is everything.
Catching high balls from side, using hoops
To improve confidence catching, we also did a small amount of catching a thrown or kicked ball from the side, having worked through a few hoops.
Tips for coaches – Confidence Cohesion Technique
Any coach can utilize these drills with their keeper. The objectives are the same – enhance footwork, follow the ball better with the eyes, and judge the flight of the ball.
A coach can use any one of the drills independently, and involve multiple players, especially attackers, to sharpen their skills too.
Try to encourage the keeper to use these skills – their footwork, their eyes and reflexes, and be brave to make the judgement calls and decisions that will come up regularly in games.
