
With the new season beginning this week, we want to sharpen our keepers and dust off some of the inevitable rust gained over the winter break.
In this session we worked on the basics for the younger keepers – catching, footwork, dead-ball kicking and one on ones.
As in most sessions, we finished with a game of “keeper frisbee” – see below.
Youngers keepers – 2007-2010
Three session points for this session;
- Dead-Ball kicking – goal kicks, improving the distance and technique.
- Footwork – between cones, and catching/shot stopping
- one v ones – how to deal with, when to come out.
Finish off with 15 mins Keeper (American) frisbee
Why we like keeper frisbee for young goalkeepers
Session Details
Dead-Ball kicking – goal kicks, improving the distance and technique.
Young goalkeepers are rarely good with their feet, especially when they start out. So we usually spend some time on “kicking” as well as “positional” footwork. In this section we approached “dead-ball kicking’ as one would do in a goal kick.
Many goalkeepers have problems with goal kicks. Not just younger keepers. Subject to the size and strength of the keeper, it then boils down to a combination of kicking technique and mental attitude.
For beginner keepers, we like the following structure or routine. It won’t work for everyone, but it will give the young keeper a template to build their own routine.
- Choose your target for the ball – left or right hand side of halfway line.
- Place the ball on the side of the 6 yard box which makes kicking to your desired. If you’re lick to the left, put the ball on the left of the 6 to make it easier. This doesn’t prevent you from aiming a kick from the right of the 6 towards the left hand side – just easier to achieve.
- Place the ball like its your grandmother’s fragile vase. You break it you suffer. Think about the ground – are there divots where the ball can fall into a hole?. Is the ground firm around the ball, where your “standing foot” will land. Above all, take it seriously.
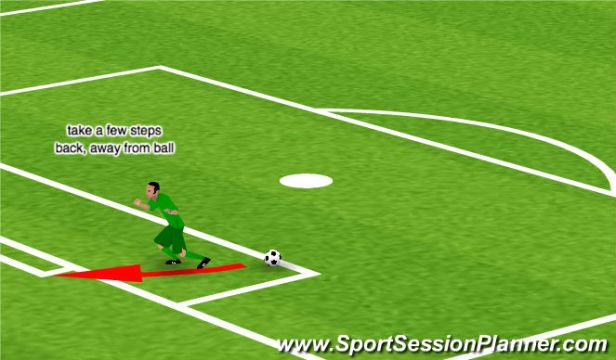
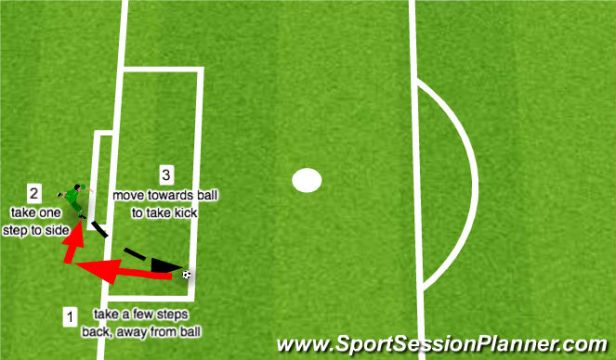
- Take a few steps back away from the ball, and one to the side, away from the line of the ball.
- The move quickly towards the ball to make the kick
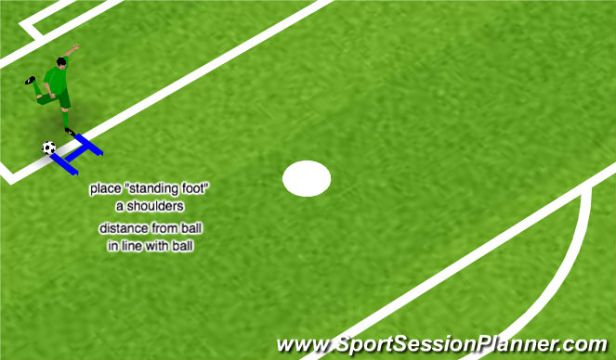
- Try to land your “standing foot” – NOT the kicking foot – about a shoulders distance from the ball. In other words, about the distance between your shoulders. If your standing foot is too close to the ball you may kick it – ouch!
- Place your standing foot about in line with the ball. If your too far in front of the ball, or too far behind the ball, you’ll mis-kick. Try it, but prepare to fall over and be laughed at!
- Follow through with the “swing” of your foot.
- If you’ve seen golfers, they carry on swinging the club well after they’ve hit the ball.
- You’re doing the same. It will give more power and help balance your body – try not to fall over!.
This won’t work for every keeper. But it will give the young keeper a template from which to build their own routine. Every keeper makes a bad goal-kick. The secret is not to let it get into your head.
Above all, don’t expect to get this straight away – persevere. And when you do a “bad kick” follow the procedure for the next one, having already forgotten the last one.
Pause a few seconds and take a breath. You can do this!


In this drill we practice by kicking the ball from about 3 yards from goal, into the net – saves chasing the ball all night! The keeper should aim to hit the net hard and high – about 4 foot off the ground or higher. Each keeper take a kick in rotation. After 2 goes each, stop and coach each keeper with positive comment. Don’t forget, its mainly in the head – confidence is everything.
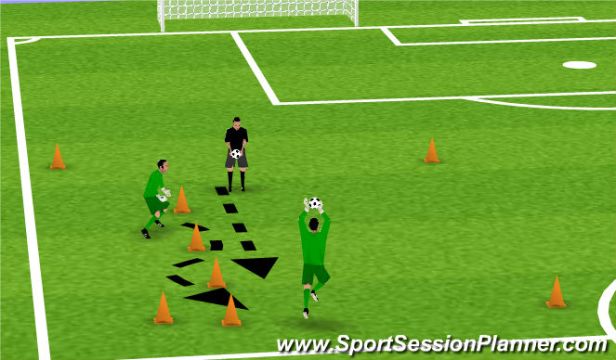
Footwork – in pairs – skip through cones and make save.
Lay out 6 cones in a line. Keeper skips through the line, then turns towards the thrower/kicker, and makes the save. Alternate after three goes.
The ball can be thrown or kicked depending on the skill level. The important feature of this exercise is footwork, and making the save.
One v ones – how to deal with them.
One of the most nerve-jangling things for a keeper is to face a striker all alone, wither without the ball – the dreaded “one versus one”.
By one v one we consider any situation where the keeper has to face a lone striker. So that included penalty kicks, as well as “break aways”.
So forget everything you think about 1v1’s, and face the reality.
The striker should score MOST of the time. We tell our keepers to expect to be successful, one in three occasions. Thats to say, about 33% of the time.
So in a Penalty shootout, best of five, we expect them to save 1 out of the five, and perhaps two (ie 1/3 or 2/6). If they get two, we should win the shootout. No pressure!
Same for breakaways. One in three. Thats all we expect. So, actually, NO PRESSURE. The pressure should all be on the striker. They are expected to score. The keeper just has to do their best.
So in this drill we try to arm them with the ideas to best cope with each situation. Because every situation will be very different.
We have one keeper in goal, on their natural resting place for the ball around 30-40 yards from goal – the halfway line.
Another keeper plays striker, and they run in when the coach shouts go. The ball is played through by the coach from 30-40yrds (depending how much space you have) from different parts of the field – central, wide, etc.
The keeper has to choose whether to come for it, and pick it up inside the area, or kick it if outside. If the striker gets the ball early and is dribbling, the keeper has to decide how far to come out “and narrow the angle” and what what angle to take to best cover the goal.
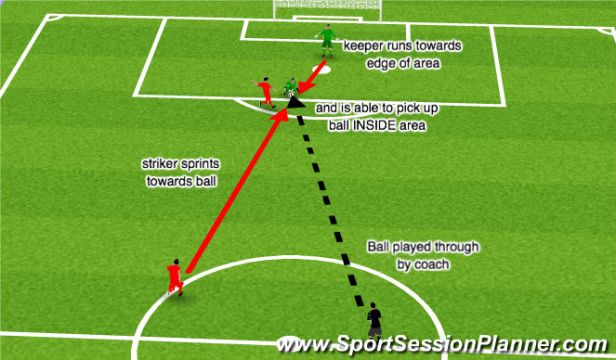
To give them confidence, the first ball is kicked hard enough to easily make the area before the striker gets to it.
The following through balls are more difficult, dropping just short of the box forcing a decision – kick, dribble, but NOT pick up.
Add the odd ball straight to the striker who then dribbles – a proper 1v1.
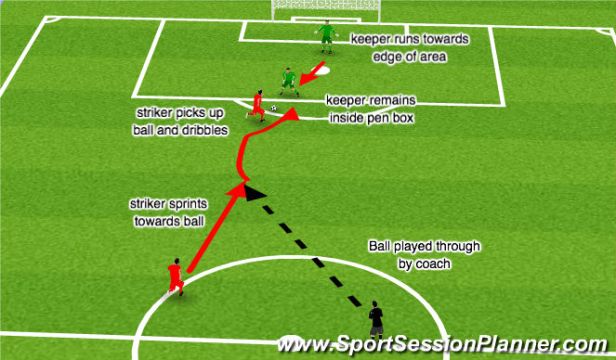
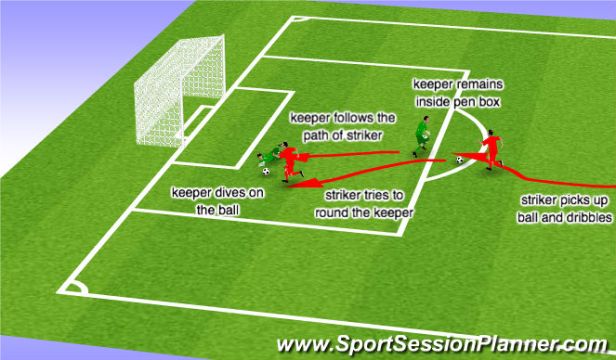
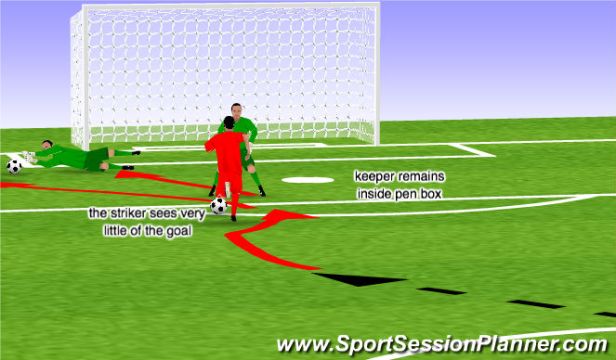
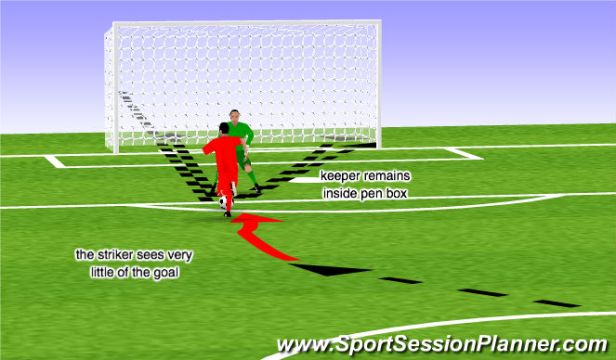
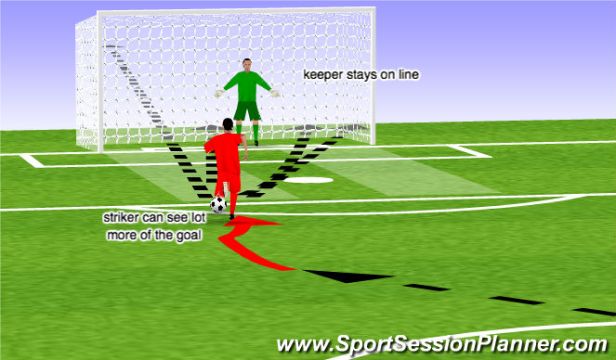
This is where the challenge really comes, and the keeper has to judge where to come out to – we prefer staying inside the penalty box as much as possible, to retain “the arms”, and make yourself “big”.
In this sequence of images we show how the keeper can make themselves big, making it hard for the striker to choose – shoot, chip, or dribble “round” the keeper. We show how getting close to the striker narrows the angle – limiting the amount of goal the striker can see clearly – compared to staying on, or retreating to the line, which allows the striker to see almost all the goal.
Tips for coaches – Confidence Cohesion Technique
Any coach can utilize these drills with their keeper. The objectives are the same – enhance footwork, follow the ball better with the eyes, and judge the flight of the ball.
A coach can use any one of the drills independently, and involve multiple players, especially attackers, to sharpen their skills too.
Employ 1v1 in your regular practice sessions – this will help your strikers as much as your keeper, and keep it “real” for the keeper.
Try to encourage the keeper to use these skills – their footwork, their eyes and reflexes, and be brave to make the judgement calls and decisions that will come up regularly in games.
